Introduction to OBIEE (Oracle Business Intelligence)
How to Create your first
report in obiee
Step 1: Setting up the ODBC(open database connectivity)
connection to the data provider.
Start -> Control panel ->Administrative tools ->
Data source(ODBC), now select System DSN tab.

If the system data source is already listed out just select the data source else click on add button to add new data source provide.Now select a driver for which you want to set up data source,in our example data source provider is from SQL server(choose your driver based on data source provider),click finish.


Give a suitable name to refer data base and select the sql server from which your database.This can be obtained by below process.Click next

Now select the SQL server authentication and enter respected username and password.Click next

Select default data base which you are using and click next -> finish.


Finally you can Test data source once it finishes successfully click ok , you can find the data source provider list.

Step 2: Creating repository in OBIEE.
Start -> Oracle business intelligence -> Administration ->File ->New and give suitable name to your repository.

After specifying suitable name new repository will open having physical layer,business model and mapping layer and presentation layer.

Now go to file -> import -> from databases a list of data sources will obtain select the suitable data source and give suitable authentication.Connection type will be ODBC 3.5 in our example since we have used ODBC data sources.Click ok.

Now u select import...to import the respected database to your physical layer.

The repository contains three layers physical layer,business layer(Business model Mapping),presentation layer.Database whatever you selected will be imported to physical layer of repository.

In business model mapping u need to decide which are the tables should be fact and dimension.Based on the business requirements you need to make joins between the tables.Two type of schemas we can follow here Star schema and Snow flake schema.

The Physical diagram will open for the selected tables with joins.

Now perform the join operation between these tables based on suitable key.If the key is unknown between these table make complex join between those tables for this join system itself decides the key and it will be unknown for us.
To make simple join,complex joins use the foreign key and new complex join option as shown below respectively.To make join drag from dimension to fact table.

After selecting drag from dimension to fact table.Once u performed the joins between tables based on the business requirements, you will find yellow tables as fact and white color tables as dimension in business layer.


Start -> Oracle business intelligence -> Administration ->File ->New and give suitable name to your repository.
After specifying suitable name new repository will open having physical layer,business model and mapping layer and presentation layer.
Now go to file -> import -> from databases a list of data sources will obtain select the suitable data source and give suitable authentication.Connection type will be ODBC 3.5 in our example since we have used ODBC data sources.Click ok.
Now u select import...to import the respected database to your physical layer.
The repository contains three layers physical layer,business layer(Business model Mapping),presentation layer.Database whatever you selected will be imported to physical layer of repository.
In business model mapping u need to decide which are the tables should be fact and dimension.Based on the business requirements you need to make joins between the tables.Two type of schemas we can follow here Star schema and Snow flake schema.
The Physical diagram will open for the selected tables with joins.
Now perform the join operation between these tables based on suitable key.If the key is unknown between these table make complex join between those tables for this join system itself decides the key and it will be unknown for us.
To make simple join,complex joins use the foreign key and new complex join option as shown below respectively.To make join drag from dimension to fact table.
After selecting drag from dimension to fact table.Once u performed the joins between tables based on the business requirements, you will find yellow tables as fact and white color tables as dimension in business layer.
U can get business
model whole diagram as following
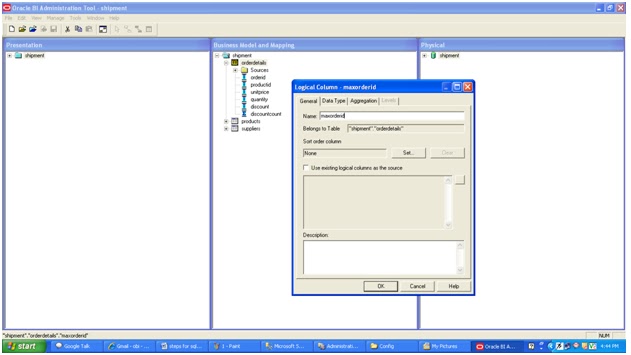
To create logical column
Right click on table where logical
column u have to create
Give name for that
logical column
Select the data type double click on selected logical
table source
Select column on
which your operating……
Select the physical table and suitable column on ur
performing operation then click ok
U will find
Then
choose aggregate function u want to do
Then
u will find logical column………
Finaly , selected tables and columns drag to presentation layer ,tat
will be displayed in the obi presentation service ……(i.e table and columns)
Step 3: OBIEE presentation service
1)Log in to the obi
In subject area u will
find the database on which u want create report and dashboard.
Click the subject area
u will find all the tables in the subject area over the left pane……using
tat we should generate the report
Generating a report
By exploring the tables
in left pane u will find the columns in the respective table just click on the
column names u required for the report…….
Click on the display
results…..u will find the required result in the specified layout form.
Click on the save
report…..and save the report in the required folder(if not create folder using
the create folder option)
How to create a prompt
in dashboard

Click on the
prompt…..which shows subject …..further click tat…
Explore the left pane
and select the suitable column on which u want to use as prompt
U will get……
Select
presentation variable….and give suitable name for that…
Save that prompt in
required folder……
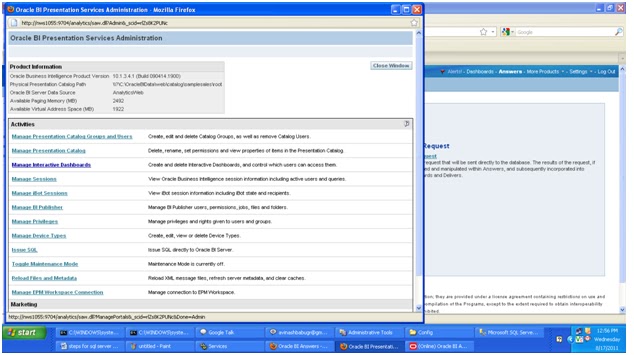
For creating
Dashboard…..select settings ->administrator
Select
manage interactive dashboard
Select create dashboard
and give suitable name for tat and close window….
Now select dashboard……
And click on click
here……
Now drag and drop the
prompt and results…in required format….

Give the presentation
variable name as value
Now give save ……. and it
will show the preview of that…

No comments:
Post a Comment